Unlock the Secrets to Making Traditional Polish Pierogies
There's something truly magical about a plate of homemade pierogies. These delightful Polish dumplings, with their tender dough and savory fillings, evoke warmth, tradition, and culinary comfort. If you've ever dreamt of recreating that authentic taste in your own kitchen, you're in the right place. This comprehensive guide will walk you through how to make pierogies recipe from scratch, transforming humble ingredients into an unforgettable meal.
Making pierogies might seem like a labor of love, and it certainly is, but don't let the multi-step process intimidate you. It's a highly rewarding culinary adventure that many families turn into a cherished group activity. Imagine gathering friends and family, rolling dough, stuffing pockets, and sharing stories as these delicious dumplings come to life. Plus, making a big batch means you can enjoy some fresh and freeze the rest for future cravings!
What Are Pierogies and Why Make Them Homemade?
At their heart, pierogies are boiled, often pan-fried, dough dumplings typically stuffed with a variety of fillings. While often associated with Polish cuisine, similar dumplings exist across Eastern European cultures. The most classic fillings usually involve combinations of potatoes, cheese, and/or sauerkraut. Once cooked, they boast a delightful contrast: a soft, chewy exterior and a rich, flavorful interior.
The decision to embrace a how to make pierogies recipe at home rather than reaching for the frozen aisle is a commitment to unparalleled flavor and texture. Store-bought versions simply can't compare to the fresh, vibrant taste of homemade dough and fillings. You control every ingredient, ensuring quality and catering to your exact preferences. From the tenderness of the dough to the perfect balance of seasoning in the filling, every bite is a testament to your efforts. It's more than just food; it's a connection to culinary heritage, a celebration of simple ingredients, and a truly satisfying accomplishment.
Essential Ingredients for Your Pierogi Masterpiece
A successful pierogi journey begins with selecting the right ingredients. We'll focus on a beloved traditional filling: creamy potato, tangy sauerkraut, and savory cheese.
For the Dough:
- All-purpose flour
- Eggs
- Water (or milk, for a richer dough)
- Salt
- A touch of oil or melted butter (for elasticity and tenderness)
For the Traditional Potato, Cheese & Sauerkraut Filling:
- Potatoes (Russet or Yukon Gold work best for mashing)
- Onion
- Sauerkraut (rinsed and squeezed dry)
- Cheese: Farmer's cheese is traditional. If unavailable, a blend of Monterey Jack and ricotta cheese makes an excellent substitute, offering both melt and creaminess.
- Butter and a little oil (for sautéing)
- Salt and black pepper to taste
For more creative and diverse stuffing ideas, explore Perfect Pierogi Fillings: Potato, Cheese & Sauerkraut Secrets. The possibilities for pierogi fillings are endless, from sweet fruits to hearty meats.
Crafting the Perfect Pierogi Dough: A Step-by-Step Guide
The dough is the foundation of your pierogi. A good pierogi dough should be pliable, easy to roll, and tender once cooked. Here’s how to make pierogies recipe dough like a pro:
- Combine Dry Ingredients: In a large mixing bowl, whisk together the flour and salt. Create a well in the center.
- Add Wet Ingredients: Crack the eggs into the well, then gradually add the water (or milk) and oil/melted butter.
- Mix and Knead: Begin mixing the ingredients from the center, gradually incorporating the flour from the sides until a shaggy dough forms. Turn the dough out onto a lightly floured surface and knead for 5-7 minutes. The dough should become smooth, elastic, and no longer sticky.
- Rest the Dough: Form the dough into a ball, lightly grease it, and place it back in the bowl. Cover tightly with plastic wrap or a damp cloth and let it rest at room temperature for at least 30 minutes. This resting period is crucial as it allows the gluten to relax, making the dough much easier to roll out thinly.
Assembling Your Delicious Pierogi: Filling, Shaping, and Cooking
Preparing the Filling:
- Cook Potatoes: Peel and cut your potatoes into 1-inch chunks. Boil them in salted water until fork-tender, about 15-20 minutes. Drain thoroughly and mash until smooth. Allow the mashed potatoes to cool completely in the refrigerator. This cooling step prevents the cheese from melting prematurely and makes the filling easier to handle.
- Sauté Onions: While potatoes cool, chop the onion finely. Sauté the onion in a little butter or olive oil until softened and translucent, but not browned.
- Combine Filling Ingredients: In a large bowl, combine the cooled mashed potatoes, sautéed onions (including the oil they were cooked in for extra flavor), well-drained sauerkraut, and cheeses (Farmer's cheese or the Monterey Jack/ricotta blend). Mix thoroughly until all ingredients are well incorporated. Season generously with salt and pepper to taste. Refrigerate the filling until ready to use.
Shaping the Pierogies:
- Roll the Dough: Divide your rested dough into two or three manageable portions. On a lightly floured surface, roll out one portion of dough to about 1/8th-inch thickness. You want it thin enough to be tender but strong enough to hold the filling without tearing.
- Cut Circles: Use a round cookie cutter, a drinking glass, or a pierogi maker to cut out circles, typically 2.5 to 3 inches in diameter. Reroll scraps as needed, allowing them to rest briefly before cutting again.
- Fill and Seal: Place about a teaspoon of the prepared filling in the center of each dough circle. Be careful not to overfill. Fold the dough over to create a half-moon shape. Firmly press and crimp the edges together to seal them completely. A good seal is key to preventing the filling from escaping during boiling.
- Repeat: Continue this process with the remaining dough and filling. As you form the pierogies, place them on a lightly floured baking sheet or parchment paper, ensuring they don't touch to prevent sticking.
Cooking the Pierogies:
- Boil: Bring a large pot of salted water to a rolling boil. Carefully drop a batch of pierogies (don't overcrowd the pot) into the boiling water. They will sink initially, then float to the surface. Once they float, boil for another 2-3 minutes. This ensures the dough is fully cooked through.
- Drain: Using a slotted spoon, remove the boiled pierogies and drain them well. You can serve them immediately at this stage, often tossed with a bit of melted butter.
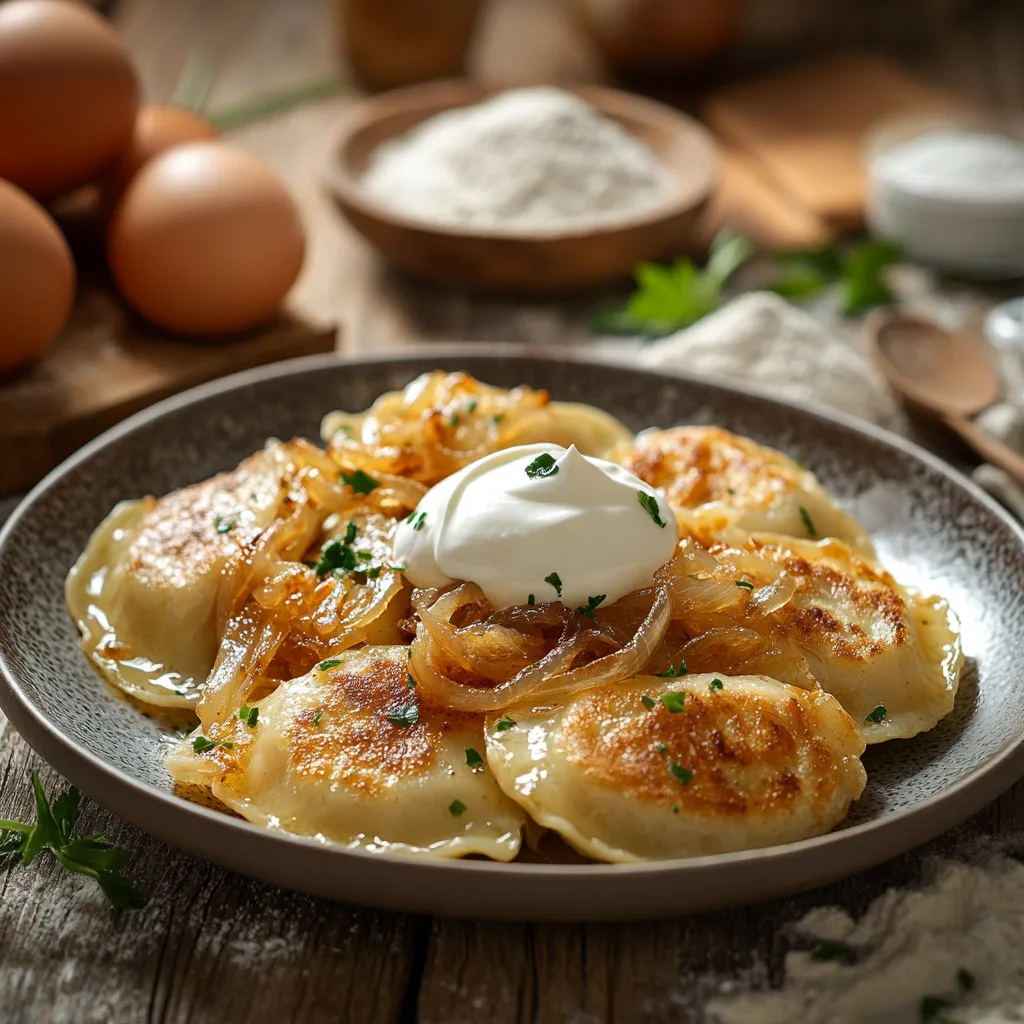
- Fry (Optional, but Recommended!): For that irresistible golden crispness, melt a generous amount of butter in a large skillet over medium heat. Add the boiled pierogies in a single layer and fry for 3-5 minutes per side, or until beautifully golden brown and slightly crispy. Add some sautéed onions or bacon bits to the pan while frying for extra flavor!
For smart tips on preparing ahead and how to store your creations, learn Anyone Can Make Pierogies: Easy Steps to Freeze & Enjoy.
Serving Suggestions
Traditional pierogies are often served with a dollop of sour cream, caramelized onions, crispy bacon bits (or "skwarki" - fried pork rinds), or a sprinkle of fresh dill. A side of Polish Kapusta (braised cabbage) also pairs wonderfully with the potato, cheese, and sauerkraut filling.
Conclusion
Embarking on the journey of how to make pierogies recipe at home is a rewarding experience that connects you with a rich culinary tradition. From kneading the tender dough to crafting the savory filling and finally frying them to golden perfection, each step is a labor of love that culminates in a dish bursting with flavor and heritage. Whether you turn it into a lively family affair or a quiet weekend project, the satisfaction of creating these homemade Polish dumplings is truly unmatched. So, roll up your sleeves, gather your ingredients, and prepare to delight your taste buds with these irresistible pockets of deliciousness!
