Anyone Can Make Pierogies: Easy Steps to Freeze & Enjoy
The thought of making homemade pierogies might conjure images of grandmothers tirelessly rolling dough in bustling kitchens, a task seemingly reserved for the most seasoned cooks. But what if we told you that anyone can make these delicious, savory dumplings? It's true! While there are several steps involved in crafting the perfect pierogi, the process is incredibly rewarding, a fantastic way to bond with family, and surprisingly accessible. Dive in and discover the joy of creating a big batch, not just for immediate delight, but also to stock your freezer with future meals.
Embracing the Pierogi Tradition: Why Homemade is Best
Pierogies, whether you spell it "pierogi" or "pierogies" (both are accepted!), are more than just food; they are a culinary embrace, a taste of comfort deeply rooted in Eastern European traditions, particularly Polish and Ukrainian cultures. These delightful dough pockets, often stuffed with a tantalizing mix of potatoes, cheese, and sauerkraut, are first boiled to tenderness and then typically pan-fried to a golden crisp.
While store-bought options exist, nothing quite compares to the rich flavor, tender chew, and customizable fillings of a homemade pierogi. Making them from scratch allows you to control every ingredient, ensuring a fresh, authentic taste that elevates any meal. It's an experience that transforms a simple dinner into a memorable event, especially during holidays or special gatherings.
Mastering the Pierogi Filling: Flavor Foundations
The heart of any great pierogi lies in its filling. While countless variations exist, our family's favorite, and a classic choice, features a harmonious blend of mashed potatoes, tangy sauerkraut, savory sautéed onions, and rich cheese. This combination offers a perfect balance of textures and flavors that are simply irresistible. For more detailed guidance on achieving the perfect blend, check out our guide on
Perfect Pierogi Fillings: Potato, Cheese & Sauerkraut Secrets.
Crafting the Perfect Potato Base
Start by peeling and cubing your potatoes (Russets or Yukon Golds work wonderfully for their starch content). Simmer them in a pot of salted water until they are fork-tender, usually about 15 minutes. Once cooked, drain them thoroughly and mash them until smooth, ensuring no lumps remain.
The most crucial step for a well-behaved filling is to **cool the mashed potatoes completely**. Warm potatoes can make your filling too soft and difficult to work with, potentially leading to a soggy pierogi or one that bursts during cooking. Pop them in the fridge for at least an hour, or even better, prepare them a day in advance.
Aromatic Onions and Tangy Sauerkraut
While your potatoes cool, sauté finely chopped onions in a little olive oil or butter until they are softened and lightly caramelized. This adds a beautiful depth of sweetness to the filling. For the sauerkraut, ensure it's well-drained and chopped if the strands are very long. Excess moisture from the sauerkraut can also make your filling watery, so squeeze it gently if needed.
Selecting Your Cheeses
Traditional recipes often call for Farmer's cheese, a soft, unripened cheese with a distinct tangy flavor. If Farmer's cheese is elusive in your local market, don't fret! A fantastic substitute is a combination of 2 ounces of shredded Monterey Jack cheese and 2 ounces of creamy ricotta. This blend mimics the texture and subtle tang of Farmer's cheese, contributing to a rich, cohesive filling. Once all components are prepared, combine the cooled mashed potatoes, sautéed onions (including the oil they were cooked in), drained sauerkraut, and cheeses in a large bowl. Mix thoroughly, taste, and adjust seasonings as needed. Cover and refrigerate the filling until your dough is ready. Making the filling a day or two ahead can save valuable time on pierogi-making day!
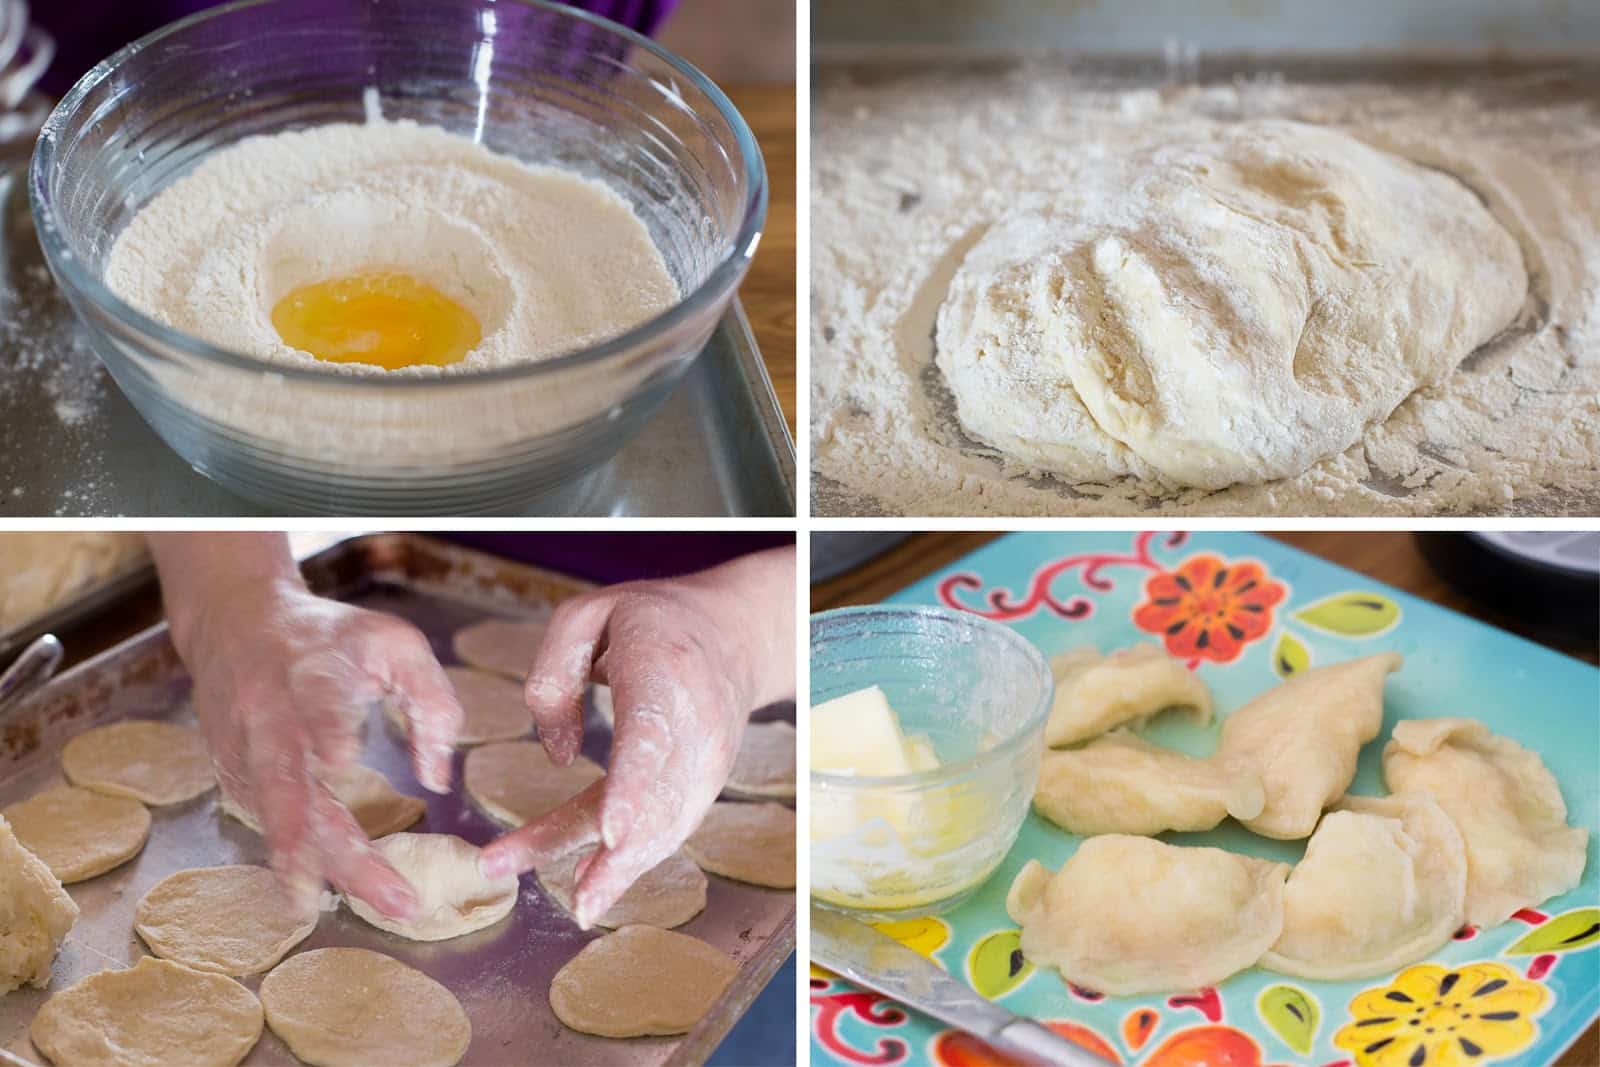
The Art of Pierogi Dough: Pliable Perfection
A perfect pierogi requires perfect dough – pliable enough to roll thin, strong enough to hold its filling without tearing, and tender when cooked. While recipes vary, the core ingredients remain simple, producing a dough that's both forgiving and delicious.
Simple Ingredients, Stellar Results
Most homemade pierogi dough recipes typically call for:
- All-purpose flour: The foundation of the dough, providing structure.
- Eggs: Add richness, color, and elasticity.
- Warm water or milk: Hydrates the flour and helps form the gluten structure. Using milk can result in a slightly richer, more tender dough.
- Salt: Essential for flavor.
- A touch of oil or melted butter: Contributes to the dough's pliability and prevents it from drying out.
Mixing, Kneading, and Resting
Combine your dry ingredients in a large bowl, then gradually add the wet ingredients, mixing until a shaggy dough forms. Turn the dough out onto a lightly floured surface and knead it for about 5-10 minutes. The goal is to develop the gluten, making the dough smooth, elastic, and springy. You'll know it's ready when it feels soft, not sticky, and bounces back slowly when poked.
Once kneaded, the dough needs to **rest**. This step is non-negotiable! Cover the dough with a damp cloth or plastic wrap and let it rest at room temperature for at least 30 minutes. Resting allows the gluten to relax, making the dough much easier to roll out thinly without snapping back. If you're making a huge batch, consider dividing the dough and working with one portion at a time, keeping the rest covered. For a detailed walkthrough of the entire process, including dough preparation, see our
How to Make Traditional Polish Pierogies: Step-by-Step Guide.
Assembling Your Delicious Dumplings: Rolling, Stuffing & Sealing
This is where the magic happens and where many hands make light work! Gather your friends and family and turn pierogi assembly into a fun, communal event.
Rolling the Dough Just Right
On a lightly floured surface, take a portion of your rested dough and roll it out evenly. The ideal thickness is about 1/8 inch – thin enough to be delicate but not so thin that it tears when handled or filled. Use a round cutter (a drinking glass or a cookie cutter works perfectly) to cut out circles, usually 2-3 inches in diameter. Reroll any scraps and continue cutting until all the dough is used.
Cutting and Filling
Place a small spoonful of your chilled filling in the center of each dough circle. Be careful not to overfill, as this makes sealing difficult and can cause pierogies to burst. A good rule of thumb is about 1 to 1.5 teaspoons of filling for a 2.5-inch circle.
The Critical Seal
This is perhaps the most important step for preventing leaks during cooking. Lightly moisten the edges of half the dough circle with a little water using your fingertip. Fold the dough over the filling to form a half-moon shape. Press the edges together firmly, starting from the center and working your way outwards, ensuring no air pockets are trapped inside. For an extra secure and decorative seal, crimp the edges with the tines of a fork. Place the completed pierogies on a lightly floured surface or a parchment-lined baking sheet to prevent sticking while you work on the rest.
Cooking and Freezing for Future Enjoyment
With your pierogies assembled, it's time to cook them or prepare them for the freezer.
Boiling to Perfection
Bring a large pot of salted water to a rolling boil. Carefully drop the pierogies into the boiling water, making sure not to overcrowd the pot; cook them in batches if necessary. They will sink to the bottom at first, then float to the surface as they cook. Once they float, let them simmer for another 1-2 minutes to ensure the dough is fully cooked through. Use a slotted spoon to remove them from the water.
The Golden Finish: Pan-Frying
While boiled pierogies are delicious on their own, the traditional method involves pan-frying them to achieve a wonderfully golden and slightly crispy exterior. Melt some butter (and optionally, sauté some chopped onions or bacon bits) in a large skillet over medium heat. Add the boiled pierogies and fry them for 2-3 minutes per side until they are beautifully golden brown.
Serve your fresh, hot pierogies with a dollop of sour cream, more fried onions, or extra bacon bits for an authentic and satisfying meal.
Freezing Pierogies: Your Future Self Will Thank You!
One of the greatest advantages of making homemade pierogies is the ability to freeze them for quick and easy meals later.
*
Freezing Uncooked Pierogies: This is often preferred as it results in a fresher taste when cooked later. Lay the freshly formed, uncooked pierogies in a single layer on a lightly floured, parchment-lined baking sheet. Ensure they are not touching each other to prevent sticking. Place the baking sheet in the freezer until the pierogies are completely frozen solid (this usually takes a few hours). Once frozen, transfer them to airtight freezer bags or containers. They can be stored for up to 3-4 months. When ready to cook, simply boil them directly from frozen until they float and are tender, then pan-fry as desired.
*
Freezing Cooked Pierogies: If you've boiled a large batch and want to save some, you can freeze them too. After boiling, lightly toss the cooked pierogies with a little oil to prevent sticking. Allow them to cool completely. Then, spread them in a single layer on a baking sheet and freeze until solid. Once frozen, transfer them to freezer bags. To reheat, you can boil them from frozen, pan-fry them, or even bake them in a preheated oven until heated through and golden.
Conclusion
Making homemade pierogies is a culinary journey that rewards you with not only incredibly delicious food but also a sense of accomplishment and perhaps even cherished memories of cooking with loved ones. Don't be intimidated by the steps; embrace the process, savor the aromas, and enjoy the satisfaction of creating these beloved dumplings from scratch. Whether you're a seasoned cook or a kitchen novice, anyone can master the art of the pierogi. So roll up your sleeves, gather your ingredients, and prepare to delight your taste buds with these buttery, crisp, and incredibly satisfying pockets of joy. Your freezer – and your family – will thank you!